Wednesday, 26 February 2014
Being the Patient
Last week I went though surgery on my toe to fix an ingrown toenail. The procedure that was done was called the Vandenbos Procedure. In the past 6 days of healing I have discovered something about myself: I may make a good nurse, but being the patient is really not my thing. I believe that this has something to do with my nursing background. At work, we spend our time hoping for the best outcomes for our patients, but also planning for the worst - we need to be prepared. Over the past days I have found it very, very easy to fall into the "planning for the worst" rut. I have incorrectly thought that I've sustained almost every negative outcome that could come from this procedure (from sepsis to necrosis).
This process has so far been a revelation for me. I truly did not realize how hard being a patient is. In school we have been taught about the negative effects being ill or postoperative or in pain has on the patients' state of mind - but until I was put into the patient position, I never really understood. I also have realized that worrying about the worst case scenario is not helping me heal one bit. I have decided that I need to take a step back and let my doctor worry about the worst case scenario and take on a more hopeful view of things - afterall, think of all the beautiful shoes and sandals I will be able to wear this summer once I am fully healed...
Thursday, 6 February 2014
Top Five Gift Ideas for the Man in Your Life
Since Valentines Day is coming up quickly - and since my house seems to be the place where projects go to die lately - I decided to round up my (technically Brett's) best gift ideas for the man in your life. These gifts range in price from $23 to $200, so there is something for everyone's budget! If you are like me, then buying gifts for men is not at all easy so I hope this can help.
1. You can find this Ralph Lauren decanter here.
2. For these Villeroy & Bach old fashioned drinking glasses, go here.
3. These cuff links are great for a car lover, but metalsmiths has a huge selection of all different kinds of novelty cuff links. To see more, go here.
4. For the technology loving guy in your life, an iPad case would be nice. There is a huge selection on etsy - you can find this one here.
5. A nice pocket knife is a staple item for most men (particularly my farmer husband). Again, etsy has a huge selection. You can find this one here.
1. You can find this Ralph Lauren decanter here.
2. For these Villeroy & Bach old fashioned drinking glasses, go here.
3. These cuff links are great for a car lover, but metalsmiths has a huge selection of all different kinds of novelty cuff links. To see more, go here.
4. For the technology loving guy in your life, an iPad case would be nice. There is a huge selection on etsy - you can find this one here.
5. A nice pocket knife is a staple item for most men (particularly my farmer husband). Again, etsy has a huge selection. You can find this one here.
Tuesday, 4 February 2014
How to Cable Stitch
Hello! We will be using this cable stitch for an upcoming scarf tutorial. So, like I did with the back and front post double crochet tutorial, I am going to preface the scarf tutorial with a simple how-to for the cable knit stitch.
As you can see in the above picture, each of the two cables twist a different direction (the top cable twists to the left and the bottom twists to the right). To change the direction of your cable is very easy, as the two techniques are almost exactly the same.
To start a cable you cast on the amount of stitches you need to make your project the appropriate width. The cable is done on a knit section that is flanked by a purl section on each side. For example, the above is done with the following sequence: K5 P3 K4 P4 K4 P3 K5. The cable is done on the K4 sections. You will have a certain amount of normal rows between the row that you work the cable into. I did 5 normal rows of K5 P3 K4 P4 K4 P3 K5, then on the 6th row I worked my cable into the K4 sections.
What you need:
Any yarn you like
Appropriate needles for your chosen yarn
A cable stitch holder (mine is like a short double pointed needle with a little "v" in the middle)
Details of working the cable:
Essentially, to work the cable you simply slide the first 2 stitches of the K4 section onto your cable stitch holder (step 1). Then you put the holder the the front (for twist right) or to the back (for twist left) and knit the last 2 stitches of the K4 section as normal (steps 3 and 3). Then you go back to your 2 stitches on the cable stitch holder and knit those (step 4).
Tuesday, 28 January 2014
A Humble Beginning: My First Date with Brett
After a couple of days of getting to know one another via text message, Brett finally asked me out. I was so excited to put a face and an actual person behind the texts. We decided to meet at a Tim Hortons (a Canadian coffe/doughnut shop) on our university campus. We both had class that day, but I got there a few minutes before he did. As I awkwardly stood around waiting for this person who I wasn't sure would even show up, my mind was racing. I couldn't believe that I was actually going out on what was really a blind date. When Brett arrived and we got seated with our drinks we started to really get to know each other. This conversation was mostly held up by Brett - what can I say, he has a gift for being able to carry a conversation with almost anyone. I was so nervous that I was saying very little; in my mind all I could think was "don't say something stupid, don't say something stupid...".
I didn't hear anything from Brett for the rest of that day after we left Tim Hortons. I wondered if I ever actually would again; my conversation with him left me feeling so young. He was in his fourth year and it seemed like he totally had is life together, whereas I was in first year just trying not to fail chemistry. But the next morning, when I was in my chemistry class (I am realizing that maybe if I had texted less and paid attention more in chemistry I wouldn't have had to try so hard not to fail...) I got a message from him saying "Hi Aubrey, I had a really good time yesterday. How is your morning going?". I was thrilled. It didn't take him long to ask me out on a "real date" to a movie.
| Brett and I on our first date - going out to a movie. Note that I am wearing a strapless shirt in this picture... There is indeed a shirt there. |
Tuesday, 21 January 2014
Back in Scrubs
This past week marked my first week back in scrubs since Christmas holidays. It felt good to get back to it! I almost forgot how much I liked having a role as a nurse in the hospital. It is easy to forget, admidst the craziness of exams and finishing up classes for the term, why I actually went into nursing. Coming back this past week was a good reminder of the amount of good that we nurses and nursing students are able to do.
I hope that you are able to find a career path that makes you feel as happy as I am feeling now that I am back in my scrubs!
Thursday, 16 January 2014
Healthy Eating and Exercise Update
![]() |
| Source |
Here are my top five motivators/tips:
1. I pack my own lunch. There are so many hidden calories/grams of sodium/grams of sugar in foods that you can buy in cafeterias. Also, I make sure to pack my lunch the night before because otherwise I would never do it in the mornings.
2. Read the labels. As annoying as standing in a grocery aisle and reading/comparing every different kind of granola bar is, it is worth it to find out what is actually in the food you are eating.
3. Remind yourself that it is worth it. When you eat well, you feel better. I've been sick less, felt better physically and mentally and I have simply just felt better about myself since I have started eating better.
4. Have a healthy treat at the end of the night - something that actually feels like a treat. For me, that is lactose free ice cream and occasionally some angel food cake too. For anyone who is lactose intolerant, Chapman's makes a lactose free ice cream that is amazing! I have had soy "ice cream" and it does not even compare to the real thing; this Chapman's ice cream is actual ice cream (minus the lactose). Also, it's no sugar added, so it is a win-win.
5. Try out the "My Fitness Pal App". I love this app. It makes it easy to keep track of how much exercise you're getting, what you've been eating, and how much water you've been drinking. I find it much easier to stay motivated when I see my calories going in and calories going out.
I hope that you have a healthy New Year and continue checking into Live, Love and be Married blog! I'm still working on that darn scarf...
Tuesday, 14 January 2014
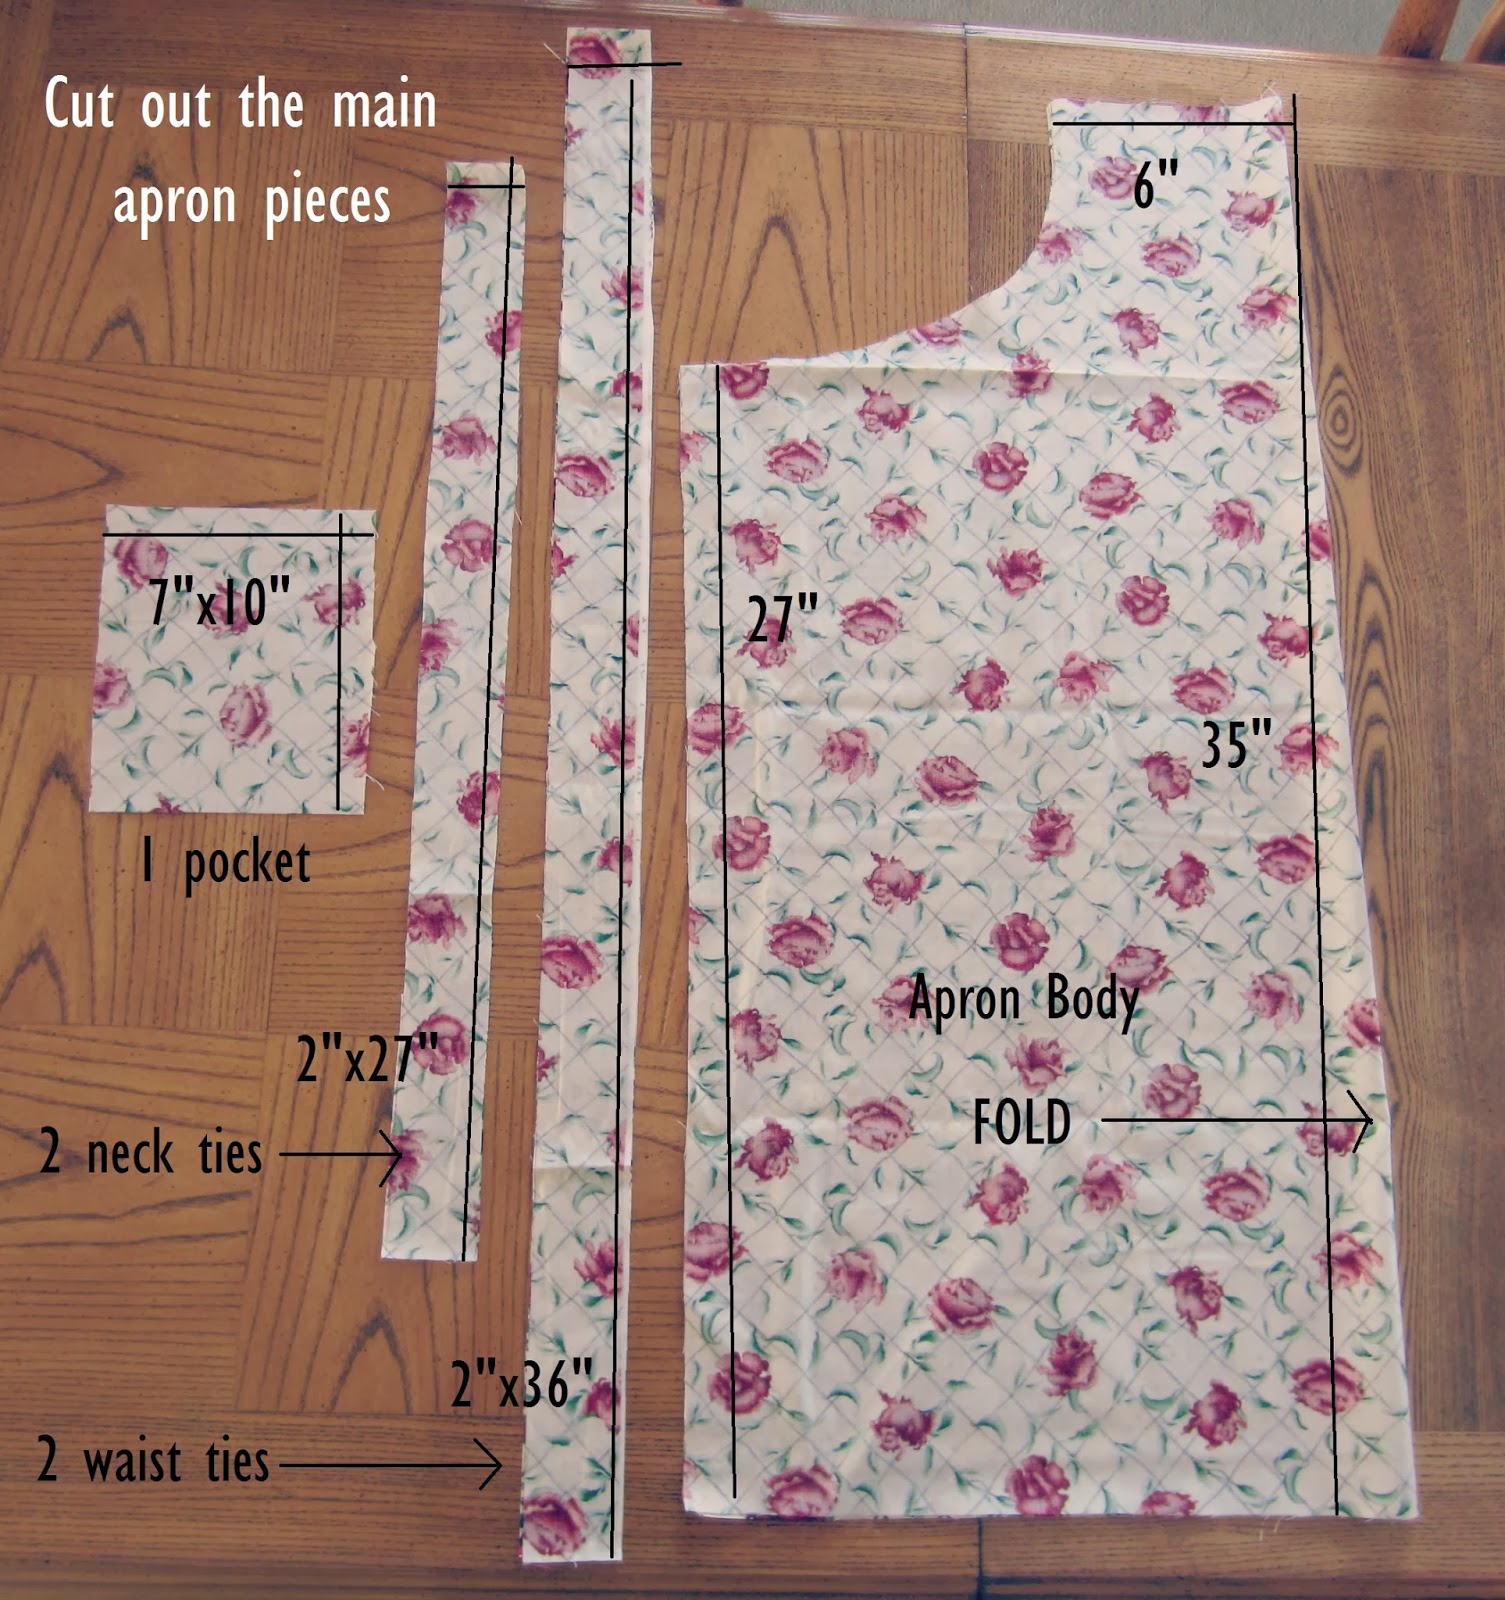
Chef's Apron Tutorial
Hello! This week I plan to get back to my regular posting schedule. I was supposed to be back to it last week, but unfortunately we were going through some family stuff that kept me from my usual writing.
This apron tutorial has been sitting half done for quite a while now, and I am so happy that I finally managed to share it here.
What you will need:
1 1/2 yd of main body fabric (I used 100% cotton)
1/2 yd of coordinating trim fabric
matching thread
scissors
sewing machine
iron
ironing board
2. Make the neck loop and ties.
3. Assemble the main body of the apron.
4. Make the trim.
4. Attach the pocket.
This apron tutorial has been sitting half done for quite a while now, and I am so happy that I finally managed to share it here.
What you will need:
1 1/2 yd of main body fabric (I used 100% cotton)
1/2 yd of coordinating trim fabric
matching thread
scissors
sewing machine
iron
ironing board
1. Cut the pieces.
2. Make the neck loop and ties.
3. Assemble the main body of the apron.
4. Make the trim.
4. Attach the pocket.
You're done!!
Subscribe to:
Posts (Atom)


.jpg)