Showing posts with label Crafts. Show all posts

Monday, 1 December 2014

Currently - December Edition // Day 1 of Christmas Photo Challenge

Well folks, things have really hit the fan around here.  I am moving home because I got my final practicum in our nearest small town (YAY!).  We are also trying to get the house decorated for Christmas, finalize any Christmas shopping.  Oh yeah, and study for exams!  On top of those things, Brett is manning the farm solo this week and getting the run around from truckers (to try and get some grain hauled to the elevator).  The reason for this long rant it just to prepare you for some possible irregular posting in the coming weeks...  On the other hand, my posting could also become very regular as I attempt to avoid studying by writing lots of blog posts.

This year's Christmas tree.  My apologies for the poor quality photo.  I've been moving (again) and misplaced my camera battery charger and thus this photo was taken with my iPhone (which I find does a really poor job of taking photos in low light).
In any case, here is what is happening with us currently:

Baking: Unfortunately, not a whole lot is happening in this area lately.  But I am going to try throw together some English muffins today and post that recipe ASAP.

Drinking: Caramel apple cider.  Did you know you can get these for a Keurig?  Yep, it's pretty life changing.

Reading: I just finished Divergent, Insurgent and Allegiant.  These are some good books.  One and two are definitely my favorite (I didn't really love the ending, I'm going to be honest).  But I loved Divergent and Insurgent.

Wanting: To get started with Christmas baking.  I've got a long list of recipes I want to try this year. 

Looking: At the snow outside our picture window.  There is something I just love about winter.

Playing: Fetch with George.  He is really enjoying attacking the Christmas ornaments, so I am trying to distract him.

Sewing: Nothing at the moment, but plans are set for a tulle skirt for graduation and a couple of beach cover-ups.

Enjoying: Having satellite TV for the first time in ages (I've really been missing Dr Phil and Say Yes to the Dress).

Wearing: This top from Target.  It is comfy but still looks nice.  I think I will probably end up getting one in every color.

Waiting: To start exams on the 8th.  I just want to get them over with!

Loving: Our Christmas decorations.  There is nothing like relaxing on the couch in the dark with the Christmas tree lit up.

Anticipating: Our trip to Cuba at the end of the month.  Brett and I got very very lucky when his parents decided to take us with them to Cuba.  I have never been on an all-inclusive vacation and am so excited!

Smelling: My English muffin dough rising.

Praying: For Brett to stay safe on the farm in this cold weather.

Feeling: Blessed to have a healthy family, lots of friends, ample food in the fridge and a truly wonderful husband.

Monday, 24 November 2014

Hazelnut Wreath Ornament Tutorial


I am obsessed with rustic Christmas decor this year (and probably will be next year too).  I have been trying to stock up on tree ornaments, but those darn things are expensive!  So, I decided to make these little hazelnut wreaths for our tree.

Let me start by saying that nuts with the shell are way more expensive than I anticipated.  Who knew?  But from a $25 bag of mixed nuts from bulk barn (which contained hazelnuts, walnuts and almonds) I made 36 ornaments.  Way more than I thought I would be able to make.  So all in all I call this project a success.

Also, I think this would be a fun project to do with kids because their little fingers would be good at arranging the wreaths while you (the adult) works the hot glue gun.

So lets get to the fun stuff!

What you will need:

-Hazelnuts with their shell (the amount is a little tricky because mine were mixed nuts [I bought around 3 lbs] and I picked out the hazelnuts... but you use 7-8 nuts per ornament)

-Hot glue gun

-Canning jar lid (I used one from a narrow mouth quart jar - I found the wide mouth to be too big)

-Clear aerosol lacquer to seal

-Raffia, Ribbon, or Baker's Twine for bows (see this post for how I tied my bows)

-Ornament hooks for hanging

The Steps:

1.  If you bought mixed nuts like me, separate the hazelnuts out into a bowl.  Trust me, you will need to work quickly and won't have time to be rooting around for hazelnuts amongst the rest of nuts.

2.  Place 7-8 (depending on size) hazelnuts in a ring in the canning jar lid.


3.  This is the harder part.  You need to put a dot of hot glue on one hazelnut, then quickly squish its neighbour onto it before the hot glue hardens.  The upside, if you mess up it is easy to scrape off the hardened hot glue and try again.  I found the best technique was to slide two hazelnuts apart with my left index finger and thumb, drop a dot of hot glue onto the side of one of them and then quickly slide them back together.


*at no point are you hot gluing the hazelnut to the jar lid. The lid is just to help make the "wreath" round

4.  Trim off all the hot glue "strings" and let the wreath sit for a few minutes until the glue is fully hardened.  I used two jar lids, so I would make one wreath then leave it sitting in the lid until I finished with my second wreath.  By that time the first one was cooled.

Before trimming the hot glue "strings"
5.  Lacquer both sides of the wreath.  Make sure you pick up your lacquer and not a can of primer... Oops.

Woops
That's better

6.  Last thing you need to do is add a bow to top off the wreath.  I give a step-by-step on how to tie the perfect bow here, which also happens to be the perfect size for this project.

Now all that is left to do is find a spot on your tree to hang these!


Wednesday, 19 November 2014

How to Tie a Bow Using a Potato Masher

Yes, you did read that title right.  I don't know if you have seen all the tutorials of how to tie a bow using a fork floating around Pinterest.  That technique was pretty revolutionary for how I tackled bow tying.  However, those turn out so small that I never really had any use for them.  So I set out on a quest one night to find a tool that would work like a fork but would give me larger bows.  Enter the potato masher.  It works perfectly because you can use it to make two different bow sizes.

I used the middle three "tines" and it makes about a 2" wide bow, which was exactly what I was looking for for a tutorial that will be coming soon.


The Steps:

1. First off, I used my legs to hold the potato masher, if you couldn't tell in the photos - a girl only has so many hands.  Take a length of ribbon/string/etc.  I used raffia for a rustic look (something to note is that if you are tying a lot of bows with this red raffia, it will stain your fingers red...).  I left one end attached to the spool so I wasted less.  For this tutorial, the "loose end" will refer to the end of string not attached to a spool.  If you are using it where both ends are unattached, just pick any end.

2. Loop your string under the tines.  I used the middle "W" of my potato masher to make 2" bows.  You could use the outer tines as well to make something larger.

3. Wrap the loose end of string around the tines several times (the more times you wrap, the more strings you will have in your bow loop).  Make sure that the loose end is below the attached end.  You can see in the photo how I kept it underneath (this is important for when you go to tie your knot).

4. Thread the loose end over the wrapped pieces, underneath and then back up between the wrapped pieces and the "u" of the middle masher tine.  Basically you twist it with the attached end, then make a loop around the wrapped pieces (this forms the middle part of the bow that separated each looped end).  Here is an enlarged photo of the step:


5. Tie both ends of the string (loose and attached) into a double knot.

6. Snip the attached end so that it is the same length as the loose end and slip the bow off the masher.  You are done!

Hope these directions made sense.  I realize that step 4 is pretty confusing.  If you are struggling with any of these steps please do not hesitate to ask a question in the comments or send me a message on the facebook page.  No question is silly, I am always happy to help and to connect with readers!

Wednesday, 15 October 2014

Currently


Baking: lots of English Muffins.  It turns out these are really easy to make by hand.  Brett loves having them for breakfast before heading off to the farm so I try to keep them around as much as possible.
Drinking: iced tea (like actual cold tea).  Funny how in August I was drinking lots of hot tea and now that the weather has turned I am craving iced tea... Strange.  I like to make mine out of Earl Grey tea with two teaspoons of sugar and lots of ice.  Delicious!
Reading: I Have Nothing to Wear by Jill Martin and Dana Ravich.  It has been really great so far in helping me to define my personal style and make it easier to put together outfits, as well as knowing what to shop for.
Wanting: this Canon Rebel T5i.  I think it is going to be my graduation present to myself.  Only six and a half more months!

What a beauty.

Looking: at lots of travel websites.  We are hoping to do a trip to Europe next year.  I am obsessed with Scotland.  What a magical looking place!
Playing: with procrastination.  What is it about fourth year that makes me not want to do any school work?
Sewing: baby gifts.  More on this later...
Enjoying: my favorite shows being back on.  Loving Heartland and Grey's Anatomy!
Wearing: lots of layers.  It is taking me a while to adjust to the cooler temperatures.
Waiting: impatiently (something that I need to work on...).
Loving: riding boots season (as you have all heard about at length already).
Anticipating: final practicum starting in January!  I can't wait to get back into the hospital setting.
Smelling: Bath and Body Works Pumpkin Spice Latte pocetbac hand sanitizer.  Cold and flu season is upon us people!  Wash those hands!
Praying: to safely finish harvest this week.
Feeling: thankful for a productive long weekend and excited to finish up this term in a month and a half.

Wednesday, 8 October 2014

Cable Knit Beret Pattern

beret; free pattern; knitting pattern; free knitting pattern
I feel a little like Blair Waldorf when I wear my beret... It makes my heart happy.

Does it feel like forever since I last posted a tutorial or pattern?  It does to me.  Fall has gotten me into the knitting mood again and I finally, after much trial and error, finished the beret I have been working on.  Woohoo!  About four years ago I got a really nice beret from Mexx, and after many years of love the poor thing is starting to look a little ratty.  So I decided it was time to try and knit one myself.  As it happens, it turned out really well and knitted up really fast once I finally figured out how to get the right size.  I figured I had to share the pattern with you!

I found the yarn at Micheals on sale in store (online here).  It is Lion Brand's Wool-Ease Thick and Quick in Cabernet metallic (you can see a few of the sparkles in the photo above).  I used circular needles and a cable knit stitch to do this.  Both are really easy to get the hang of, but if you haven't done either, here are a few links to check out before starting this pattern:
       ~Joining and knitting in the round.
       ~How to cable knit (this tutorial is on straight needles, but the process is the exact same in the                                              round)

I made this hat to fit my approximately 23" head.  To measure my head I started at the top of my head right behind my bangs, then went around (over my ears) to the bottom at the nape of my neck and back around to the top.  For every knit-purl there is about an inch and a half when it is stretched out.

beret; free pattern; knitting pattern; free knitting pattern
Top view.

Supplies:
2 balls of Lion Brand Wool-Ease Thick and Quick
US13 (9mm) circular needle in the 16" length
Large eye sewing needle or crochet hook

Abbreviations:
C/O = cast on
Inc = increase
Dec = decrease
K = knit
P = purl

The pattern:
1. C/O 57 stitches (casting on in the round works the exact same as casting on on a straight needle)
2. K1, P1 around to make a 1.5" band (this needs to be at least 1.5" for it to not fall off your head)
3. *K1, Inc1, P1; repeat from * around once
4. *Cable stitch at the K2 space (either to the left or right, just stick with the same thing for the whole hat), P1; repeat from * around once
5. *K2, P1; repeat around 4 times
6. Repeat steps 4-5 to make 7"
7. Dec the K2 down to K1
8. *K1, P1; repeat from start to make 2"
9. Decrease stitches down as much as possible in the next round - I wasn't able to do a whole lot on the round (I am still learning to knit in the round and don't have all the tricks worked out)
10. Cut off your yarn (while the hat is still on the needles), leaving a 20" tail
11. Thread the yarn tail through the loops on the circular needle as you pull the stitches off the needles (wow that was confusing... check out this link to see someone do it.  I used a crochet hook to pull my tail through though, because I didn't have a needle with a big enough eye for the thick and quick yarn).
12.  Pull the tail tight to seal up the top of the hat and pull the left over tail through the hat.

beret; free pattern; knitting pattern; free knitting pattern

You're done!!  Hope you enjoyed!  If you have any questions, feel free to leave a comment or send me an email!  I would love to hear from you!

Friday, 3 October 2014

Oh Hey Friday // Oh Hey Fall!


Hello again to the Oh Hey Friday link up.  I am sad to admit that this post just did not happen for me last week.  Sigh.  Unfortunately that darn nursing school gets in the way of things I would rather be doing (like making random lists of things that I like) and we just got through our first round of assignments and papers.  So now that that is done, we are hopefully going to be back to the usual blogging schedule of Monday, Wednesday and Friday.  As usual I am linking up with The Farmer's Wife and September FARM - click on those links to check out more of the Oh Hey Friday link up.

I have a confession to make.  I am guilty of having pinterest home envy.  It still blows my mind that there a people who live in the homes that you see in the home decor section of pinterest.  Seriously, who has the time and money to not only put the look together, but to keep it looking that good??  Not myself, that is for sure, much as I try.

I would, however, like to change a few things around in my decor to have a bit of a fall theme.  This is mostly a coping mechanism to keep me from being the person trying to put up Christmas decor in October.  Micheals needs to help a girl out and keep their Christmas crafts/decor/ornaments awesomeness to themselves at least until November (I swear they've had Christmas stuff out for three weeks already).

So my list of five this week consists of my fall decor lusts/goals.  I want to choose some items that I can transition into more wintery pieces as well (since according to my hardworking farmer, we don't have endless amounts of cash lying around for me to spend on home decor... Men, sheesh).

1.  Fall pillow covers like this:
     I am hoping to make something sort of similar and post a tutorial on it, so stay posted.  I like this harvest one since we are farmers, very fitting.


source
2.  A tartan blanket like this:
     This would be for my sofa though, not my porch (especially since I don't even have a front porch).  I don't know if it is because Brett and I are looking into a trip to Scotland next year or what, but I have been tartan obsessed lately (like the tartan blanket I used as a scarf in my outfit of the day post).  It is also a great transitional print from fall to winter.


source
3.  Ceramic pumpkins (oh Pottery Barn, you get me every time):
      I am not the biggest fan of decorating with real pumpkins.  Don't get me wrong, carving them is fun (I have wonderful memories of pumpkin carving with my mom and dad) but I hate that they rot and get stinky.  Ceramic ones like these will stay beautiful for years to come.


buy
4.  Bronzey log holders:
     I must admit that our fireplace room gets forgotten about on the decorating side of things.  Basically we painted it and put a picture above the fireplace.  Other than that it is a bit ugly.  But I have decided that I want to make it my project to fix it up before Christmas (perhaps a before and after post will be in order).  To attempt to corral our chopped wood and paper, I would like to use something pretty like these bronze buckets from Target.


buy


5.  A trunk coffee table:

     Technically we don't have to buy this because our coffee table is actually an old trunk.  It was an antique one left from Brett's grandma.  The poor thing is not in the best shape anymore (funny how that happens to decades old things...) and just needs a little TLC for it to fulfil its full potential.  And perhaps some Pottery Barn ceramic pumpkins to dress it up a little.


source
What are you lusting for this fall?

Friday, 22 August 2014

Oh Hey Friday! // Life Lately (in pictures)


Well hi there!  Feels like forever since we talked...  August craziness really is getting the best of me these days; between trying to get going with harvest, getting in as many shifts at work as possible, trying to finish up projects and getting ready for the up coming school year, it feels like I am running in circles.  This week's Oh Hey Friday link up will be a recap of life lately.  But before we get started, the lovely ladies I am linking up with are The Farmer's Wife and September FARM.

So let's get to catching up:

1.  I'm finishing up the last of my night shifts for the summer (since I will be back at school in two weeks).

I'm looking uncannily bright eyed and busy tailed before a 12hr night.

2.  I cannot stop eating blueberries lately.  Seriously, its a problem.  I think I am going to turn into a giant blueberry like the little girl in Willy Wonka and the Chocolate Factory... #cantstopwontstop #noregrets

How can you resist when they look like this??

3.  The quilt is done!!  And we hung the headboard that my dad made us out of an old door from the farm.


To make the headboard, dad cut down the door to our mattress measurements.  Then he sandblasted the old paint off.  To finish it off, we stained it a dark brown and sealed it.

I made the calligraphy prints on either side of our wedding photo.  They say "Where you go, I will go" and "and where you stay, I will stay" (from Ruth 1:16).


4.  I've really been loving calligraphy and watercolor painting.  I find it super relaxing.  My latest design is a quote from The Notebook (you can't go wrong):


5.  Brett and I had our first field supper of the season together this past week.  It wasn't the usual field supper because neither my mother-in-law nor I made it (as I was in the city all day) and the combining got shut down because of a torrential down pour.  The canola we were swathing didn't get any rain though, so I was just me, Brett, the swather and some delicious Boston Pizza take out.  I've said it before and I'll say it again, there is nothing like enjoying a meal off the tail gate of a Chevy on the open prairie.


I hope you had a lovely week and have a great weekend.

Friday, 4 July 2014

DIY Towel Wrap Tutorial


Hi there!  If you are reading this from Canada, I hope you had a great July 1st.  If you are reading this from the U.S. then I hope you are enjoying your July 4th celebrations.  Are you looking for a DIY project for the weekend?

I saw these towel wraps at Target one day while wandering through.  I figured they would be nice to get ready in (rather than getting ready in my bathrobe, which I usually end up over heating in).  As I am always on the hunt for a great DIY, I picked up a couple of nice towels and decided that I would try to make my own.  This would be a great gift to add to a spa package or something to make to take along to the beach, now that it is finally nice out.  I like making my own because it is not only cheaper, but you can also personalize it to the size you want and to match your bathing suit.  At the same time as I made mine, I also whipped up a toddler size one for my cousin's little girl.  Both tutorials are below (and are basically the same except I added straps to the toddler one).

What you will need:


1.   (a) large bath towel ~ for the women's size
      (b) hand towel ~ for the toddler size
I used these towels from Target, but I would suggest you consider using something that has a tighter weave.  I love the plush texture of these, but they weren't the easiest to sew.  I found that the loops caught in my machine sometimes, which was a little annoying.  But if you think that won't bother you, then these would be a good choice.
2.   Pins
3.   Ribbon (for the toddler size only)
4.   1" wide Velcro
5.   (a) 1" wide elastic
length should equal measurement taken just above bust (IE where you want the towel to sit) minus 6" 
for instance, around my bust is 30" so my elastic was 24" long
      (b) 1" wide elastic using the same above formula to determine length
6.   Ruler (or tape measure)
7.   Scissors

Step 1(a) - for the women's size


Step 1(b) - for the toddler's size


Step 2


Step 3
The below picture is of the toddler size, but the adult size works the exact same.  It is easiest to pin these while it is on your body so you know how tight to make it.


You're done!!  Enjoy wrapping up in this cozy cover up.
Hope you have a lovely weekend!

Tuesday, 27 May 2014

Wire Wrapped Earrings Tutorial

Don't you love my owl mug (what the earrings are hanging off of)?
I have really been loving delicate, dangle style earring's lately.  I have seen a lot of these wire wrapped ones floating around the internet and on Etsy.  Being a lover of crafts, I couldn't simply buy myself a pair of earrings - I of course had to make them and share the tutorial with you!

First, your supplies:
-thin gauge jewelry making wire
-oblong beads (you want something that is longer than it is wide and preferably something with a corner or two, as that will make it easier to finish off - these beads that I used are sort of square shaped around)
-earring hooks the same metal as your wire
-head pins (not actual pins like you would use for sewing, these are for threading a bead onto)
-wire snips
-small round nosed pliers (my wire snips and pliers came in a set of mini jewelry making tools - I picked it up at Micheal's craft store)

The head pins, snips and pliers are not shown in the image... Oops.
Step 1 - Thread one oblong bead onto a head pin.  Fold over the top of the head pin to make a loop (to attach to the earring hook) and snip the excess.  Attach the bead to the earring hook using the loop of the head pin.


Step 2 - Now it is time for the wire wrapping.  It took me a few tries to get this right, so be patient.  If it doesn't work the first time, just unwrap and start again.

(1) Snip about a 12" piece of thin gauge wire and sticking a little bit down the hole at the top of the bead.  (2) Start wrapping around from the top down.  You want to wrap tightly enough so that each round of wire fits snugly against the one on top of it.


Step 2 - When you have wrapped down the bead as far as you want to go (or as far as the wire length will let you) you need to finish off.  Try to do this at the "back" of the earring.

Snip off any excess wire, leaving a 2mm tail at the end.  Take your round nose pliers and bend that tail around so that it clings to the corner of your bead (you can see what this looks like in the left image below).  That should hold your wire wrapping securely from coming undone and end up looking like the right image below.


Repeat the steps to make a second earring and you are done!!  You have a lovely new set of earrings to show all your friends - and when they ask where you got them you can say that you made them yourself!


Saturday, 26 April 2014

Making a House a Home and a Quick Embroidery Pattern

I am back at the farm for a short while before Term 3 of school starts and I have made it my mission to decorate a few spaces.  It is time to take our home from a bachelor pad to looking like a place where an actual female lives.  I got some of the things for our wedding but I managed to pick up a lot of stuff at a local store that carries some beautiful home accessories.


Our microwave doesn't have a timer on it so I picked up this cute Matryoshka Doll kitchen timer.  The succulent plant was a house warming gift from a friend - surprisingly, I have managed to keep it alive for over a year now!


I love owls, they are probably one of my favorite animals (other than cats of course).  When I saw this guy I knew I had to have him.  He is supposed to be for the garden but I though he looked nice on one of our end tables paired with some soy candles and another succulent.


I picked up this shelf for our bathroom a couple of weeks ago and Brett just got around to hanging it up a few days ago (house stuff goes to the very bottom of the list for a farmer in April!). 


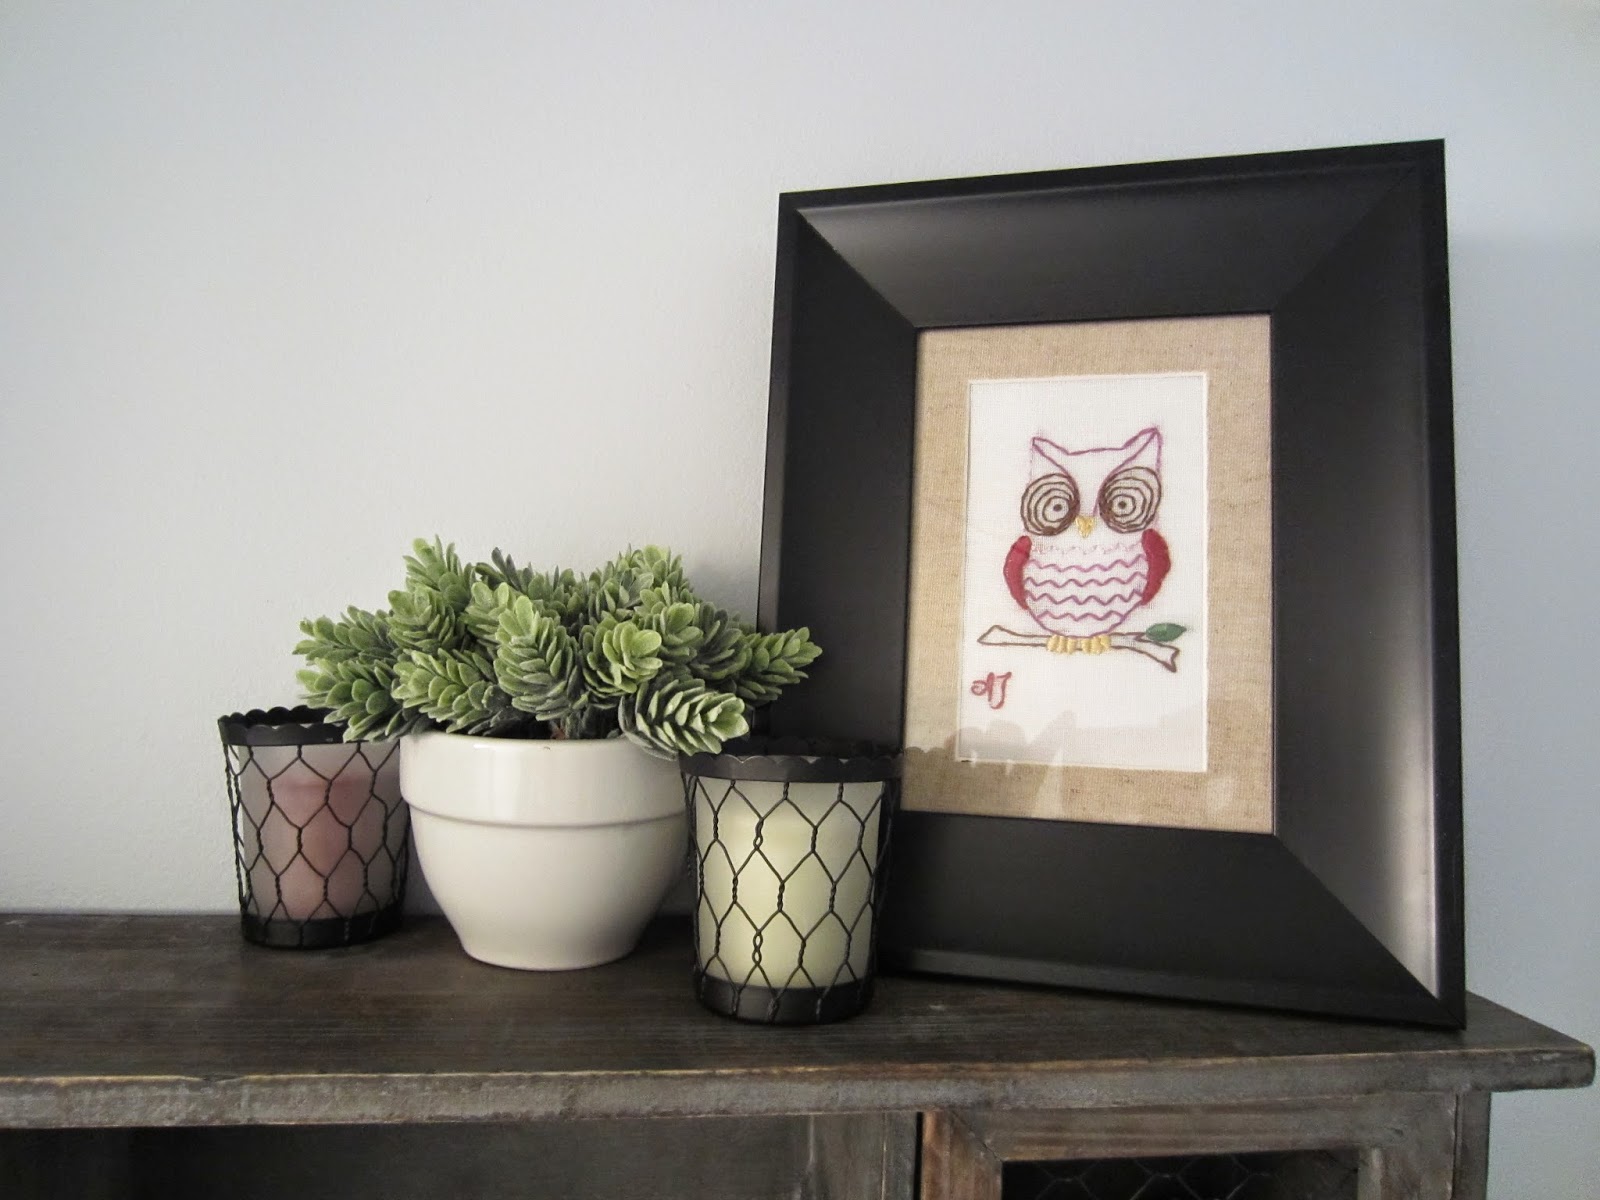
I added yet another succulent and some candles to the top as well as a framed embroidered owl that I quickly whipped up with some scraps from around the house (I am noticing there is a bit of an owl/succulent/votive candle theme to my decorating).


Isn't the owl cute?  I wanted to do his body blue (as you will see in the pattern below) but didn't have any blue embroidery thread so I made do with purple.  He still turned out pretty good though I'd say.

Here is the pattern I drew up:


I would say the easiest way to transpose this would be print off this black and white copy then put your fabric over the paper and trace it.


To frame I simply folded the fabric around a piece of cardboard to fit into my frame and taped the fabric down.  This little owl would be really cute on something like tea towels too (I may have to try that myself sometime).

Hope your weekend is lovely!